A feature to import galleries/images from Joomgallery is now available
The import function only works in Joomla 3, the import function was created to allow users to migrate to Joomla 4, because Joomgallery did not have a Joomla 4 version previously. The migration script will not work in Joomla 4.
The import script will import the following items from Joomgallery:
- Category/Gallery: name / alias / parent / description / published state / author / meta description / ordering / thumbnail preview image
**passwords are not imported, because of complications with password encryption
**in Ignite gallery, gallery access is controlled in the profile settings, not in the category, so access is not imported, but can be set easily.
- Image: original image file / gallery id / image title / author / description / date / hits / access / published state / ordering
**optionally you can also import from the image file: exif description / iptc title, tags, description / exif Camera Make/Model, Date, Aperture, Exposure time, ISO, Focal length, GPS location - Comment: image id / ip address / author / comment text / date / published state
- Rating: image id / ip address / author / date / published state / if the rating is 3 or over, it is imported as 1 'vote' in ignite gallery.
Please do the following steps to import the items to Ignite Gallery:
Step 1: Update Joomgallery to the latest version.
Step 2: Purchase a subscription for Ignite Gallery, or check you have an active subscription to Ignite Gallery
Step 3: Go to the Ignite Gallery downloads page. At the bottom of the page, download the gallery component with the JoomGallery migration script. This component is version 4.9.1 of the gallery (latest version for Joomla 3) with the migration script added. The migration must be done on the Joomla 3 website that has JoomGallery installed. Please do the migration before upgrading to Joomla 4.
Step 4: Install the Ignite Gallery component to the website. Create 1 test gallery. Review the profile settings, and make sure the following values are set correctly:
- Image quality (first tab of profile settings)
- Main thumbnail width / height / crop to the same size
- Main image width / height / crop to the same size
- Lightbox thumbnail width / height / crop to the same size
- Lightbox image width / height / crop to the same size
The migration script will create the resized images, so it is best to get the image size/crop settings correct before doing the migration. You can change the image size after the migration, but creating all the resized images a second time requires a lot of server resources.
Please review this article for tips on saving server space before doing the migration.
Step 5: Go to the Ignite Gallery component options, then choose the upload tab, please review these settings:
- Maximum Width of Original Image Stored On Server: The migration script will use this setting when importing the images. If you want to copy every image at full size, set this value to 20000.
- Maximum Height of Original Image Stored On Server: The migration script will use this setting when importing the images. If you want to copy every image at full size, set this value to 20000.
- Import Exif Image Description / Import Iptc Image Description / tags / title: Set this to yes if you want the migration script to search the original image file in Joomgallery for the exif or iptc data to import. The migration script will always import the image title/description etc from the Joomgallery database, so usually importing exif/iptc data should be set to No. But you can choose to set this to yes if you want to search the image file for extra data.
Step 6: Go to the Ignite Gallery component options, then choose the New item Defaults tab. Choose a default profile, and save the gallery options. This profile will be used by the migration script.
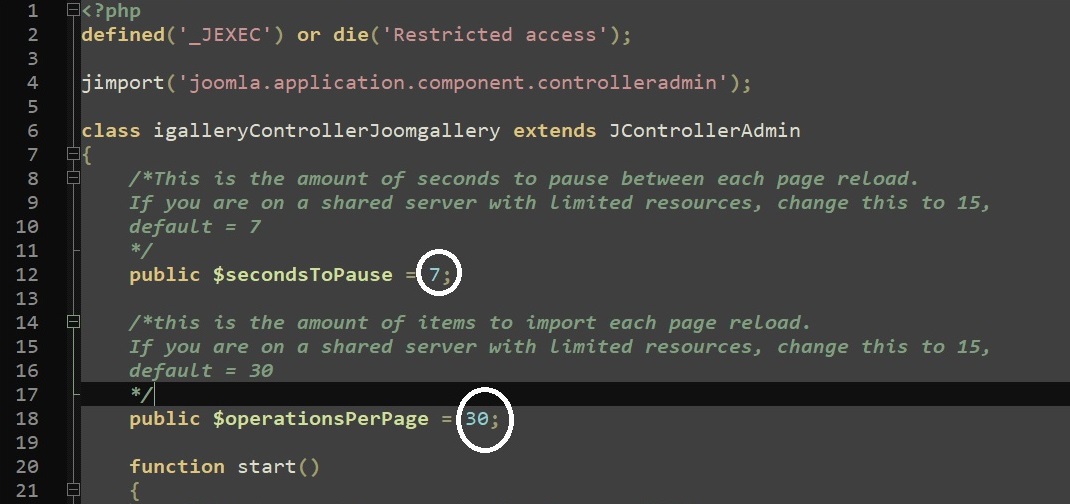
Step 7 (optional): By default the migration script will migrate 30 items, then pause for 7 seconds, then migrate 30 items, then pause for 7 seconds. If you are on a shared server with limited cpu, you may want to make the migration script go slower. If you are on a dedicated server or localhost, you may want to make the migration script go faster. You can change the pause time and number of items migrated per step. Please go to your webhosting filemanager, and edit administrator\components\com_igallery\controllers\joomgallery.raw.php:
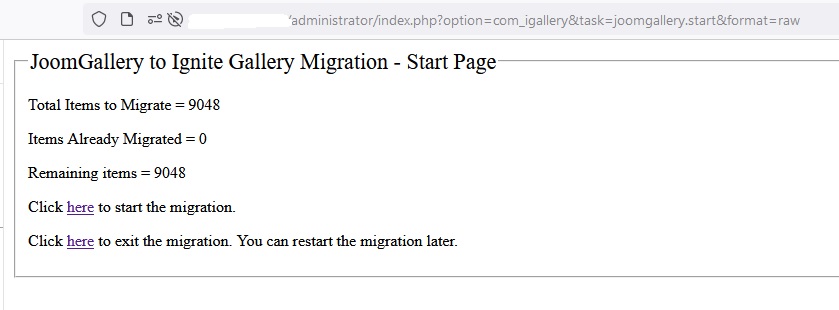
Step 8: Go the list of galleries in Ignite Gallery, the url will be administrator/index.php?option=com_igallery&view=categories, change the url so it is administrator/index.php?option=com_igallery&task=joomgallery.start&format=raw , you will see a screen like this:
Step 9: Choose to start the migration, please be patient and don't press the refresh button, the migration script will migrate 30 items, then pause for 7 seconds, then migrate 30 items, then pause for 7 seconds... Please wait and let the migration script finish.
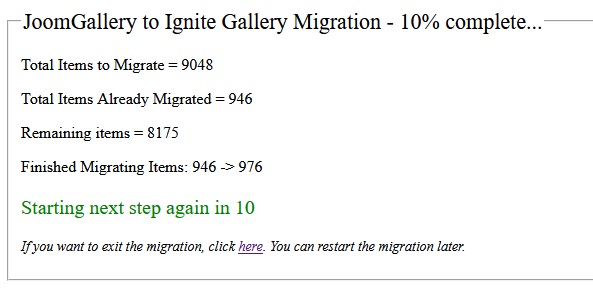
You can exit the migration script and start it again later.
**If you get any errors during the migration, please email me (Matt the extension developer).